Vivint Doorbell Camera Installation: A Professional Guide!
Vivint doorbell cameras are advanced security devices that not only allow users to see and monitor who is at the door, but also enable 2-way communication. However, you can easily operate, install, and configure these security devices with your smartphone or tablet. So, here is all you should know about the Vivint Doorbell Camera Installation process.
Moreover, this guide also elaborates on some key factors that should be taken into account before installation. Further, you will learn the step-by-step procedure of How To Install Vivint Doorbell Camera within a few minutes. For more comprehensive insights, read through this guide!
Pre-Vivint Doorbell Camera Installation Considerations
Before you start the Vivint doorbell installation process, you must take into account certain things. Check the further details for this installation process:
- Firstly, check the compatibility of the doorbell with your current Vivint security system.
- Ensure to have a doorbell camera, a drill, and a screwdriver. Pencil, a level, etc.
- Further, ensure a reliable and stable Internet connection.
- After that, you must unpack your device carefully.
- Now, match all the contents with the quick installation guide.
- Then, remove the existing doorbell camera in your home.
How To Install Vivint Doorbell Camera Effortlessly?
- Firstly, turn off the power supply or the circuit breaker to your chime box.
- Now, locate the chime box inside your home, and remove its cover.
- Then, take a photo of the chime wiring.
- After that, gently unscrew the wires and remove the old doorbell.
- Bend the wires at a proper angle so that they can’t get pulled back into the wall.
- Further, pull the cables through the back plate of the chime.
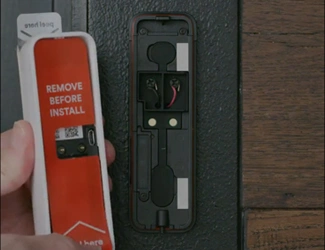
- Now, open the top waterproof seal and partially tighten the top screw with existing screw holes.
- Then, loosen the two wire terminals a little over halfway.
- Bend the wires clockwise into a hook shape.
- Next, hold these wire hooks behind the screw terminals and tighten them.
- If there are any excess wires, press them back into the holes.
- Align the small hole at your doorbell to the screw peg on the back plate.
- Now, snap the doorbell back in place and twist the wires together clockwise in the chime box.
- Hereon, make sure the twisted chime wires won’t touch any screw or metal.
- After that, replace the cover of the chime box.
- Finally, turn on the circuit breaker and wait for the green light.
- You will also hear ‘Hello, let’s get your camera set up’.
- At last, press ‘Connect’ and the Vivint Doorbell Camera Installation is finished.
Final Words
On the whole, this succinct guide has provided a detailed Vivint Doorbell Camera Installation procedure. However, you have also reviewed the key considerations you should take into account before installing it. Moreover, you can now seamlessly monitor and keep an eye on every activity happening at your door.